
Today I feel very compelled to talk about traveling with the S&S coupled Seven Cycles Evergreen. Why? Because this bike has so significantly reduced my traveling stress, it deserves some time and attention. It cost an extra $25 to fly with the bike, and that's only because it's an extra piece of luggage. The fee for a bike in a bike bag can run over $200 one way otherwise.
When I checked in, I didn't have to wait for some random airport employee to walk my bike away from me to some unknown location, as bikes in large travel bags have to be handled. The S&S bike, packaged in a soft-sided Co-Motion Co-Pilot Bicycle Travel Case that's the square equivalent of the size of the diameter of a wheel, gets thrown on the conveyor belt with every other bag offering me quite a bit more comfort that it will end up at my final destination at the same time I do. And no, I don't worry about it being crushed thanks to crush members placed inside the bag.
I used to travel all over with my bike as I often flew down south for spring training camp, I've been to a few out-of-state races, and any time I had business travel, I would figure out how to extend my stay so that I could bring my bike and tack a few days of riding on to the beginning or end of the trip. In the past, I traveled with a soft-sided bike case on rollers. It was big and bulky, but I only have good things to say about the soft-sided bike bags if you have a non-coupled bike. (I used the BikePro USA one. My bike never sustained even a scratch in all of its travels.)
Now, being able to roll my bike anywhere and handle two big suitcases at once as well as being able to put the bike in any size taxi cab or rental car, that does offer me much more freedom and far less stress than before.

Being that the bike is an Evergreen, I just pack two sets of tires so it's good to do anything I want of it no matter where I end up. For this trip, I have 28c Continental Grand Prix 4-Season tires for serious, fast Boulder dirt road riding. I've ridden GP 4-Season 23c tires for a year on my road bike with zero flats so I expect the 28c tires to be ideal for a ride I have planned Saturday. The second set, and the ones I used for the New Zealand trip as well as for most dirt trail adventures in the Boston area, are the Clement MSO 40c tires. Those will come in handy next week with a little mountain bike-esque riding on the Western Slope.

People often ask me how long it takes to put the bike together and take it apart. A coupled bike isn't a folding bike; it's not meant to be packed away on a daily basis. It's also far lighter and the couplings don't affect the ride qualities of the bike at all. However, I find the time it takes to assemble and pack to be minuscule compared with the time and trouble associated with borrowing or renting a bike that will never feel like my bike and will likely have a whole list of possible issues that will cause me to stress out before and during highly valuable vacation time.
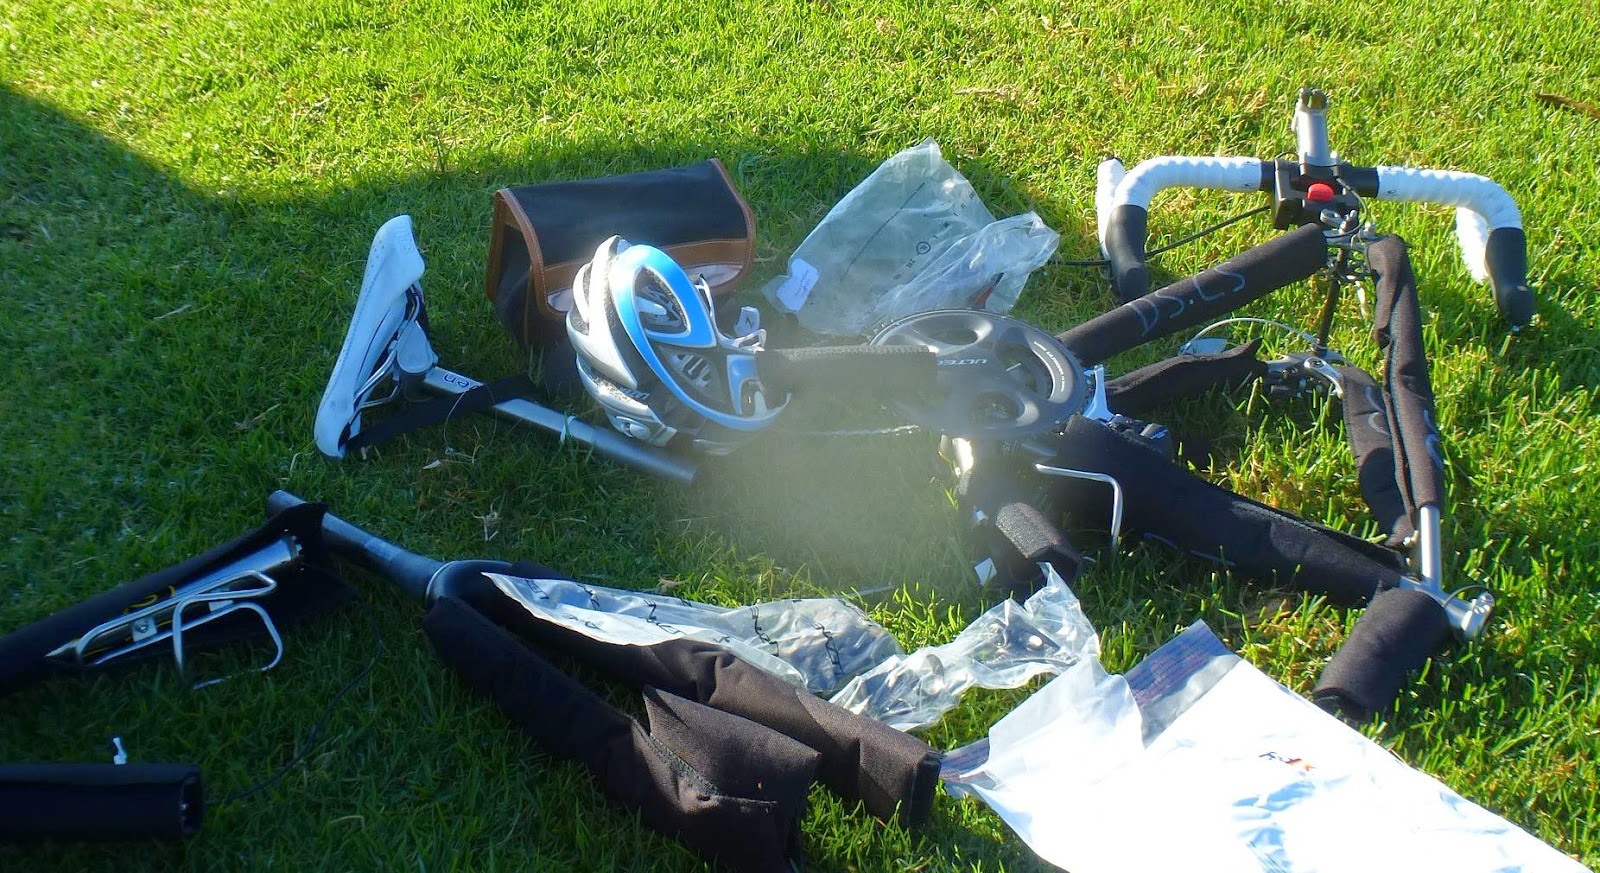
I've now reassembled my bike from its packed-away pieces three times so I feel comfortable enough to report how much time it takes and what needs to be done.

Admittedly, the first time I had to pack my bike away, it caused me some grief. It is *not* natural to take a perfectly gorgeous, brand new bike, and turn it into many pieces. I didn't realize how decoupling my new prized bike could mess with my head. I don't know if anyone else ever has an emotional reaction like I did. Since then, I've gotten used to the process and have started enjoying it, even though instinct says that a bike in two pieces means it had a bad day on the road.
Time & What Happens
0 - Unzip the bike bag.
1 min - Unpack all of the peripheral items like hex tools, skewers, rotors, everything that had to be packed separately from the bike.
6 min - Take everything out of the bike box assuming you have all of the space you need. Unwrap foam protection pieces from each member of the bike. Untape the derailleur from the chain stay (assuming it was removed), untape any packing material. Electrical tape and bubble wrap are handy for over-packing sensitive parts of the bike. It's handy to have scissors. Also take the fork and rear dropout protectors (I'm not sure of the exact term for these - they are either bolts or special quick releases that fit into your dropouts to keep loads from crushing your fork or rear triangle).
3 min - Make sure the chain is straight and where it should be, then screw the rear derailleur onto the frame being extremely careful not to cross-thread it. Tightened well.
2 min - Attach the handlebars to the bike via putting the stem back onto the steerer tube. Be sure you remember how many spacers you had above and below the stem. It shouldn't be necessary to ever unbolt the handlebar from stem. Loosely tighten since the bars will need to be aligned later, it's just good to not have the handlebars flopping around during the rest of the process.
2 min - Re-couple the bike at the S&S couplers. With the couplers near each other, plug the Di2 wires back into the junction box if it's an electronic-shifting bike. Align the couplers so their teeth mesh together, then tighten the couplers by hand twisting to the right (assuming you're holding the bike from the saddle).
1 min - Screw the pedals back on. Note: twist them toward the front of the bike - so the right pedal turns clockwise and the left pedal is counter clockwise assuming you're looking at each of the pedals from the side of the bike where the pedal is located. (The left pedal is reverse threaded for safety.) Hand tighten for now.
4 mins - In my case, I have 6-bolt rotors/hubs since I wanted the best hubs made (Chris King), and aesthetics won where it comes to having gold hubs that match the other gold on the bike. Putting the rotors on and tightening them down takes 2 minutes a piece. Make sure the rotors have the side with the arrow pointing out (so you can see it) and in the direction of forward motion. Start all 6 screws so they are in place but not tight at all, pull the rotor back in the direction the brake will force it to be pulled when it's being ridden, then evenly tighten each bolt. When they are all tight, give each a firm twist until they stop. Note: centerlock rotors involve loosening one locking piece using a special tool. This 4 minutes is cut to about 1 minute. Note: the bolts for the 6-bolt rotors require a T-25 Torx wrench.


1 min - Replace both of the quick releases onto the wheels. The levers should be on the rotor side of the hub. One spring, small side pointed in, should be on each side of the hub on the quick release.
1 min - Put both wheels onto the bike making sure the quick releases are tight, but not too tight. Ensure the wheels are in the dropouts perfectly straight.
2 min - Connect coupled cables or Di2 wires to each other. Note that Di2 junction boxes don't care where the wires are connected, so it's not necessary to keep track of the locations of these prior to disconnecting.

1 min - Insert the saddle to the tape line. Yes, before packing the bike up and removing your saddle, be sure to tape the position so you'll know for sure your saddle is in the right place without a tape measure. A saddle should not be dropped down for travel, it'll mess up any decals or paint on the seatpost.
5 - 10 min - Reattach the brake cable to the rear brake caliper. (I've learned that I don't have to disconnect the front one - yay!) This is the most difficult part of the process in my opinion. There are a lot of nuances to this. I recommend getting instruction on this part if you aren't familiar with disc brakes and how the cables thread into the barrel adjusters. Tighten the bolt that holds the brake cable very well.
5 min - Taking properly small zip ties (make sure you bring plenty of these on the trip!), fasten the rear brake cable housing to the frame at each of the zip tie guides. Be sure to have the fat part of the zip tie most hidden behind the zip guide. Make sure the handebar can turn freely before tightening down on the zip ties.

5 min - Standing over the bike, straighten the handlebars, lightly tighten the stem cap (so there is no play in the headset), then tighten the screws on the side of the stem very well.
1 min - Take the proper pedal wrench and lightly tighten the pedals.
1 min - Tighten all bolts, making sure everything is in proper alignment.
1 min - The tires will have had to have air let out of them if they are large (like the MSO 40s) so the bike will fit into the travel case. If they are road tires, there's a chance no air had to be let out. It's best to leave in air as that provides nice side padding for the bike and wheels during travel. Either way, fill the tires with air to the proper pressure.
Now take a moment to clean your hands from the grease of the chain and bolts. The Cat's Tongue towel will clean everything from your hands to the grease you accidentally smeared on your white saddle.

That's all! Be sure the bike is shifting well. If everything is done right, it should be shifting perfectly and ready to roll.
Total time: 45-55 minutes for one perfect bike and all of the riding you can squeeze in on your dream vacation! No special mechanic knowledge necessary.
As for packing the bike, I estimate it takes approximately 30 minutes from beginning to end to properly pack a bike for safe traveling. The first time takes the longest since that's when it's necessary to cut foam protector padding to length, label things, find proper ziplock bags for parts like the quick releases, 12 bolts for the rotors, getting the tools together, etc.
Now I can't wait to get the bike out to some good dirt, climbs, and see how the rider does in the thin air and hot sun of Colorado!
No comments:
Post a Comment